Product Tips
Here we will list a variety of useful tips to help you get more out of our products.
Saving Still Images in Cinematize 3 Pro
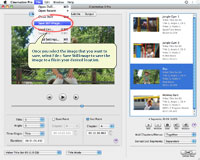
Using Cinematize 3 Pro, you can save out high quality still images from your DVD. To do this, open the DVD in Cinematize 3 Pro and move the start point on your Segment Tab until the preview window shows the image that you want to capture. Then, do one of the following:
-
From the Menu bar, select File > Save Still Image
This will allow you to save the image out to a file in your desired location. -
From the Menu bar, choose Edit > Copy
This will copy the image to the clipboard so you can paste it into another application.
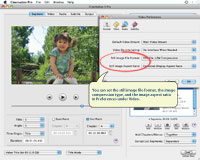
You can set some options on how the still images are created and stored by going to the "Video" section in Preferences. There you can select the file type to use when saving out to a file (BMP or TIFF), the compression type to use (PackBits, LZW, or uncompressed) and the aspect ratio for the image.
Set the Still Image Aspect Ratio to be "Corrected Display Aspect Ratio" to save out images with the proper aspect ratio for viewing, or use the "DVD Native Aspect Ratio" setting to maintain the anamorphic squeezed image as stored on the DVD.
Have fun creating still images from your favorite movies!
Two Ways to Make QuickTime Output Files
QuickTime movie files (with extension .mov) are a very versatile format suitable for editing with many of your favorite applications, including iMovie, Final Cut, Premiere, Avid, etc. Did you know that there are in fact two different kinds of QuickTime movies?This applies to all three products: Cinematize 3, 3 Pro, and Reframe.
The first type is called a "self-contained" movie, in which the video, audio, and movie information are all stored together in a single file with extension .mov. The second type is called a "reference" movie, in which the video and audio tracks are split out as separate files and a third small "reference" file is created that points to those track files.
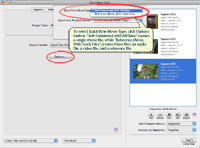
Cinematize 3 Pro, Cinematize 3, and Reframe can all create both types of QuickTime movie files, but they are set to create "self-contained" movies by default. You can control the type of QuickTime movie that the programs create by clicking on the Options button on the Output tab when the Output Format is set to QuickTime (not using Advanced Export).
If the "QuickTime Movie Type" setting is set to "Self-Contained, With All Data", then you will get out a single file with extension .mov that contains video, audio, and movie information. If the "QuickTime Movie Type" setting is set to "Reference Movie, With Track Files", you will get out three files: a video track file (usually with extension .mov), an audio track file (usually with extension .aif or .wav), and a small reference file with extension .mov.
The reference movie will contain movie information and special "links" that point to the underlying track data files. Keep in mind that the links may get broken if you rename files or move things around too much. They will almost certainly get broken if you move any of the track or reference movie files to a different drive or volume. Once the links to the underlying track data are broken, the reference movie will no longer play.
In general, we recommend that you stick with the default "self-contained" format because it is simple and portable across different computers, drives, and volumes. In some cases, however, the "reference" movie format can be quite handy. Here are some quick examples:
-
You can save time and hard drive space when working with large movies
By creating a small reference movie, you skip the sometimes lengthy merge operation in which the video and audio tracks are combined with the movie information into a single file. In addition, less hard drive is required because no merged file is created. -
You can create both the combined movie file and the track files at the same time
If you need copies of the track data separately as well as the combined movie, you can create them at the same time by using the "reference" movie format. -
You can preserve editing capability on the individual tracks
By splitting out the track data, you preserve the ability to edit or manipulate them individually. You can do quick edits, volume adjustments, or filter operations on a single track without having to modify the movie at all.
Batch Extraction in Cinematize 3 Pro – Part 3:
Reordering Clips and Putting Them Together into One Movie
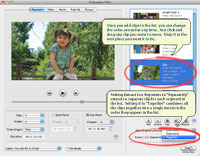
Did you know that Cinematize 3 Pro includes some basic video editing capability? Once you add clips to the Extraction List, you can actually reorder your clips by highlighting the clips and dragging them around. Once you are satisfied with the order, you have the option to extract each clip as a separate file, or together as one movie. The option to Extract List Segments "Separately" will extract a separate clip for each segment in the Extraction List, while the option to Extract List Segments "Together" will combine all the clips together into a single clip in the order they appear in the list. When the clips are combined together into a QuickTime movie, Cinematize 3 Pro also will include a QuickTime chapter track to mark the boundaries between each of the segments you linked together.
Batch Extraction in Cinematize 3 Pro – Part 2:
Saving your Extraction List in Cinematize 3 Pro
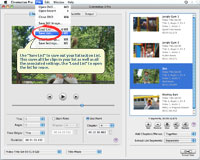
Did you know that in Cinematize 3 Pro, you can save out your entire Extraction List? After you create an Extraction List that you may want to reuse or modify later on, you can easily save it. All you need to do is go to the File menu and select "Save List". Give your list file a name, something you can remember. Later, you can load your list by going to File menu and selecting "Load List".
Saved lists store a complete record of all of your segments, including all the settings you set under video/audio/output tabs for each segment, as well as your Preferences settings.
Saving out your list would be useful if:
- you are creating a long Extraction List and want to add to it later on
- you want to remember the exact settings you used to create some movie clips
- you want to use the list as a starting point for a different project
- you want to extract the exact same segments using different video/audio/output settings
and many other situations!
Batch Extraction in Cinematize 3 Pro – Part 1:
Extracting clips with different settings
Cinematize 3 Pro now includes state-of-the-art batch extraction capabilities, but several users have contacted us saying, "The clip I extracted using Cinematize 3 Pro did not come out with the settings I selected."
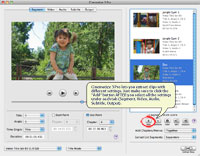
Usually what happens is that the user adds a clip to the Extraction List, then later decides to change some extraction settings. The changes could include anything on the Segment, Video, Audio, Subtitle, or Output tabs, or even in Preferences. The key is to remember to highlight the segment in the Extraction List and click "Replace" to update the stored extraction settings.
Unlike in our previous generation products, Cinematize 3 Pro allows each segment in the Extraction List to have completely different settings associated with it, meaning you can extract a video clip in MPEG-4 format, another video clip in QuickTime format, and an audio clip in AIFF format all in one shot. Those settings are stored as part of the segment, independent of what is displayed on the selection tabs.
That is why in general you want to click the "Add" button AFTER you select all the desired settings the selection tabs. If you want to change the stored settings on a segment you have already added using the "Add" button, you can do so by highlighting the segment and clicking "Replace". This will make the stored settings for the segment change to match what you have currently on the selection tabs. If you don't highlight the segment and click "Replace" after changing the settings on the tabs, your changes will not affect any of the settings stored with the segment in the list.

